%20Text%20(Violet).png)
Planes of movement have a special place in the heart of PE teachers ♥
Unlike content that was already taught at A-level in PE - such as levers, mechanical advantage and axes - and were then “transferred” to teaching at GCSE level, prior to 2016 there were no mainstream PE courses where teachers were commonly required to develop a knowledge of planes.
This led to a significant knowledge gap, a gap filled with countless lessons incorporating jelly babies, pieces of card and cocktail sticks (for the axes bit) and other practical methods of teaching planes. Whilst there is nothing intrinsically wrong with teaching planes in this way, we need to make sure that we do not assign the teaching of this simple concept to a novelty lesson but, rather, encapsulate it in our programme of delivery more generally. Planes pose no real threat to us. The concept is simple, it can be applied universally without the threat of subjectivity and irregularity and it is what PE teachers love best: it is practical.
So, here are my top ten tips for teaching planes. I don’t imagine that anyone will apply them all but I would like to think that they might create some good practice.
Tip Number 1 Explain it to them!
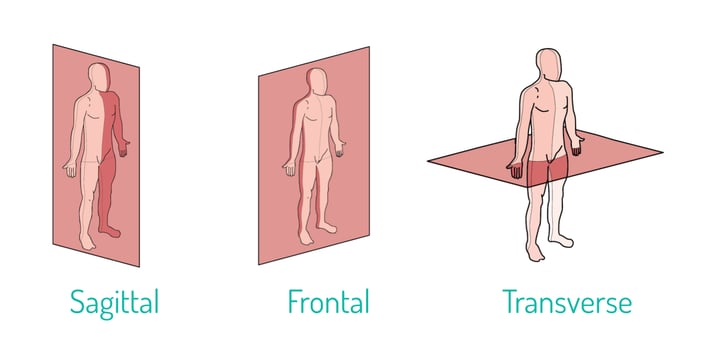
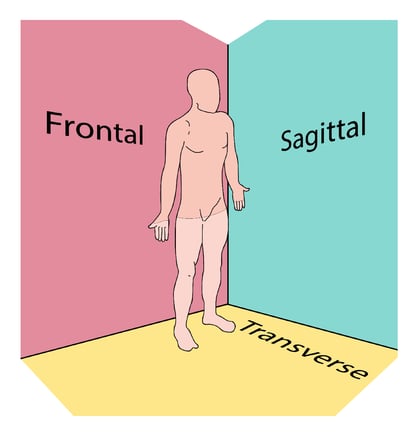
All human (skeletal) movement must occur ALONG at least one plane and there are three planes. Planes are like solid, continuous but imaginary panes of glass that dissect a performer through the navel (centre of mass).
Before we grab the jelly babies or “put Baby in the corner” (see below), we need to explain the concept to young people. If this is done well, the only threat remaining is whether the learner will acquire and retain the correct technical language. Explaining planes should take no more than five minutes because it is a single concept that can be applied universally. Do not overly focus on language at this point.
Tip Number 2 Rediscover your 1902 Model Course teacher self.
In this specific case, the "old way" of doing things works really well. Within your classroom, get the students on their feet and make them discover the solutions to the challenges that follow.
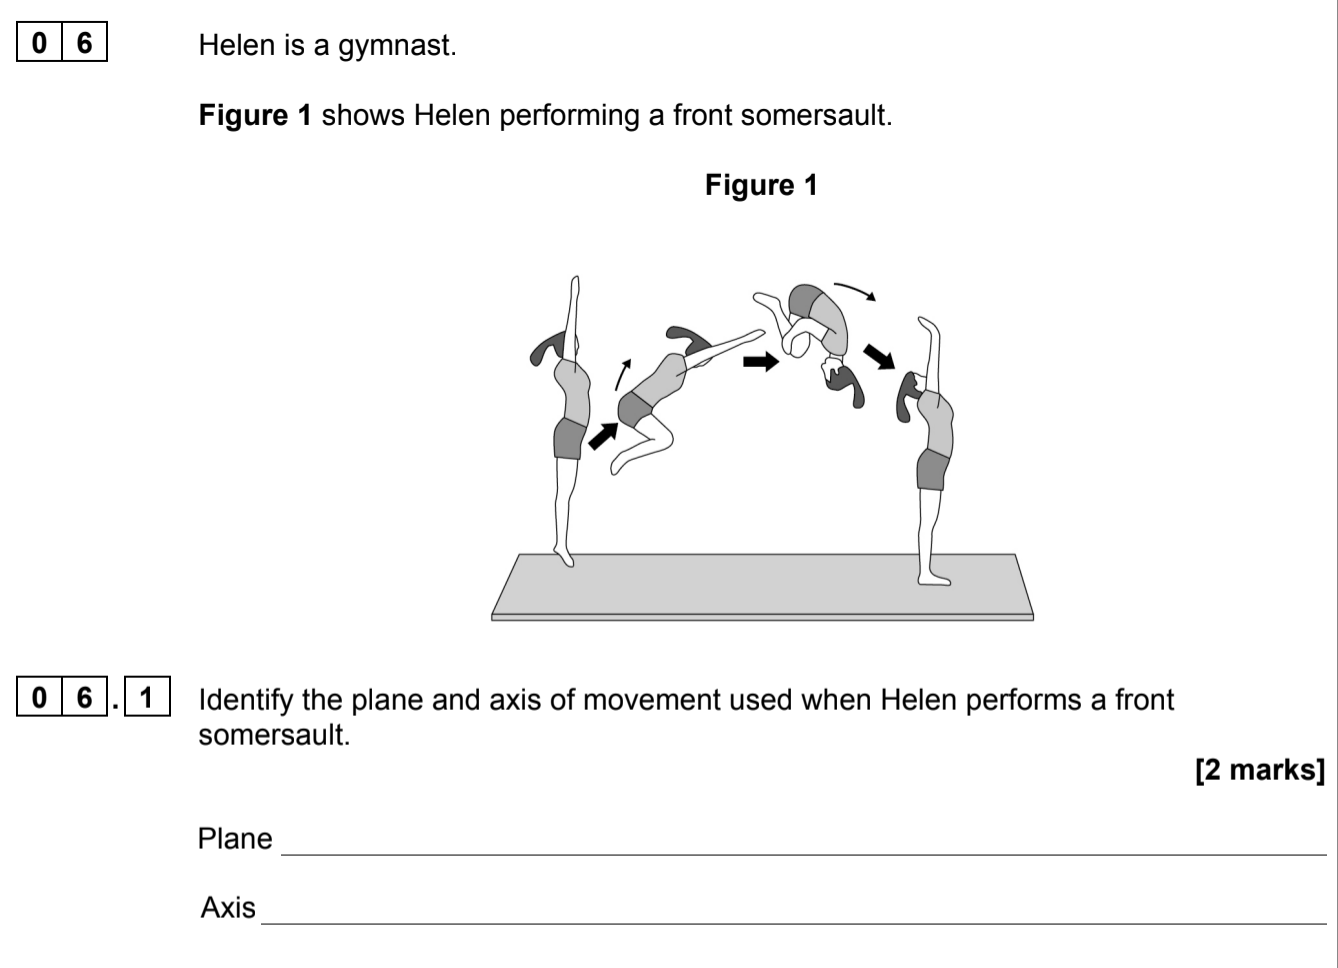
In 1902, the first ever national documentation was written for how PE (they called it “drill”) should be taught in schools. It involved a NCO (soldier) at the front of a classroom and children performing movements behind their desks. Let’s recreate that! Once you have explained planes to the students, put a single image on your big screen behind you like the one below. It is crucial that, for this specific activity, the image is the first time the students have been exposed to the names of the planes, that it contains all three planes and that it does not feature any application.
Then, start bellowing at (or politely asking) your students commands such as the following:
- “Without bending your elbow, move your left shoulder along the frontal plane.” This will be the first time they have heard the term “frontal plane” but it will be on the screen behind you.
- “Raise your right foot and move your right lower leg along the sagittal plane”. You’ll get a lot of desk kicking here. Be prepared.
- “Without taking the soles of your feet off the floor, move along the transverse plane.” For this one, you will get people looking over their shoulder, twisting their hips and a few who shuffle their feet along the floor and face a different direction.
- “Move four joints simultaneously along the sagittal plane.” Here you will get all sorts: spotty dogs, running actions,... even swimming dive starts. Pick out a few good examples and highlight them for the rest.
You can keep going endlessly with this activity. Remember to build complexity gradually and to feed back after each individual command and response (this is classic Model Course language!).
Tip Number 3 “Put Baby in the corner”
This activity drives the central concept home. By being "in the corner" and using the image below, students are forced to move along the three planes.
Following on from the activity above, this is a great moment to bring these developing ideas together. Clear a space in one corner of the room and select a student to be your Baby. If possible, label the three flat surfaces like this image:
It will be tempting to repeat the previous activity but try not to. Instead, place the student into various positions (interleave manual guidance if you wish). An example would be an abducted right shoulder in this image. Ensure the student does not move anything that does not brush along the relevant plane. When it comes to the transverse plane, tell the student they must keep their soles of the feet flat on the ground. This is actually impossible when you are rotating but it will be amusing to see them try to do it.
Tip Number 4 Give them three examples only and then play “Idea Piles”.
The key to developing AO2 is giving a narrow range of applications and then establishing a structure whereby further applications are analysed and shared across the group. "Idea Piles" serves this exact purpose. At the end of this activity, students will have a wide range of performance applications to draw upon and will have discussed the reasons why some applications must be rejected.
At this point, we are developing excellent AO2 skills. Give the students one specific example of movement along each plane. I chose the following three:
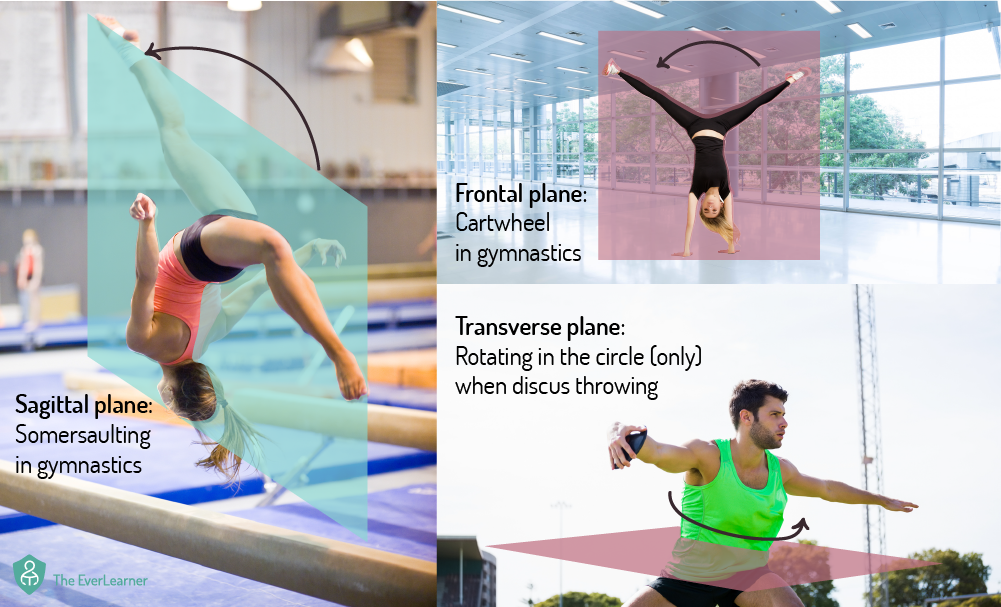
Ensure that you are instructing your students here. Instruction is important (see top tip 1) and you can explain within two minutes or so why each movement is predominantly (do not underestimate the importance of the word predominantly… see point 10) one plane or another.
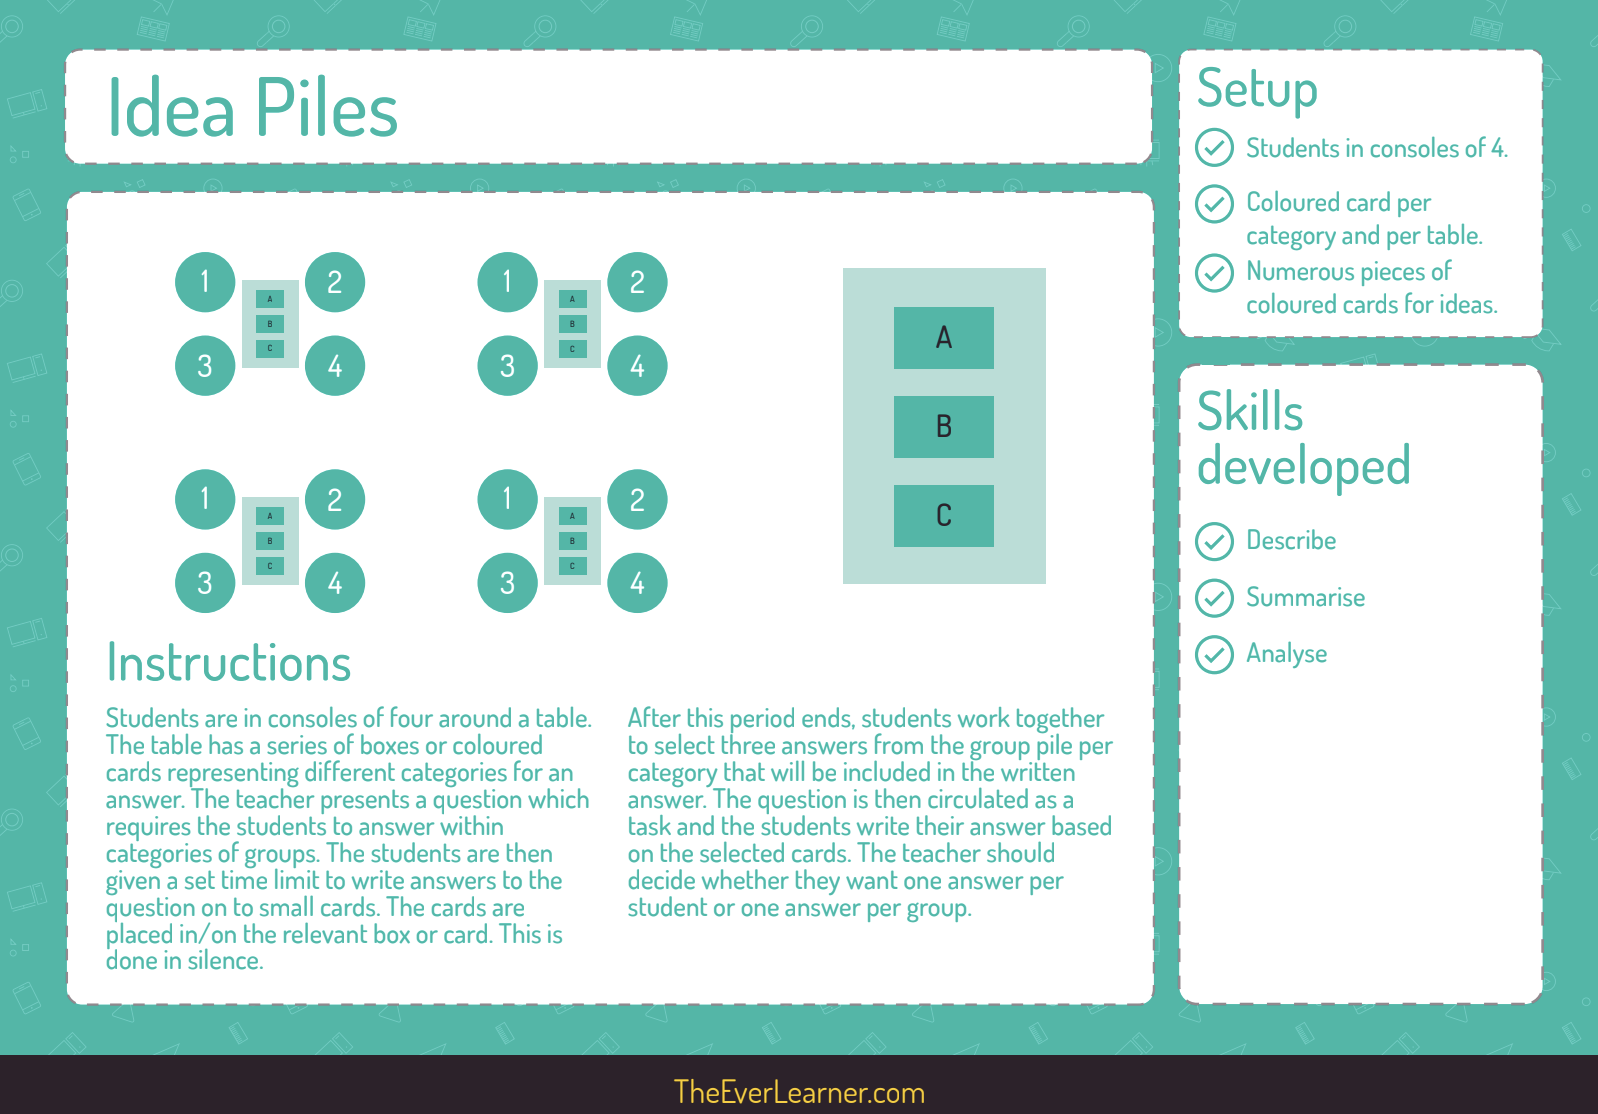
Idea piles is one of my go-to classroom activities. It works like this:
- Students on consoles of four
- Three pieces of different coloured card in the centre of each table. One labelled frontal, another sagittal, another transverse
- A range of matching coloured paper slips on the table
- Give the command of “Total silence” and, then, “Without conferring in any way, write as many examples as you can of sporting movements that relate to each plane. Place each example on the corresponding piece of paper in the centre of the table on the relevant piece of coloured paper.” And, finally: “You have 180 seconds… Go!”
- Three minutes later, give this command: “Discuss and select your best three from your whole table and then bring them forward to place them on the board/chart at the front under the relevant heading.”
This activity is superb because it allows for independent reflection, small group discussion, the need to convince a peer an example is right or wrong (this will always involve the base concept) and allows students to pool ideas and resources.
Here’s a short video of me teaching how to use idea piles in the classroom within a webinar of lots of classroom ideas I did recently and this image will help you out too:
Tip Number 5 Quiz, quiz, quiz!!!
Retrieval practice causes forgetting to be delayed and, if done well enough, memory of the key learning to be encoded more deeply and permanently.
Retrieval practice is a fundamental part of retaining information for longer periods of time. From the work of Ebbinghaus, Thalheimer and others, we know that high-quality quizzing delays the time it takes for ideas - and specifically language - to be forgotten. Quizzing works optimally when:
- marking (corrective feedback) is automated;
- feedback is instantaneous and involves at least corrective and directive structures (you can listen to James’s podcast interview all about feedback with with Paul Kirschner here);
- there are increasing stakes on whether an answer is right or wrong - I recommend that you use “practice mode”, “test mode” and “checkpoint mode” quizzing to build stakes;
- high-quality question imagery and feedback imagery is used to dual code the question stimuli. This leads to better retention than with images or text alone;
- scores and performances are used diagnostically, NOT judgmentally: a quiz should not inform a projected grade but should inform a conversation or an action between teacher and student.
Tip Number 6 Know your specification and how the topic is examined.
Unless we start with the end (the assessment) in mind, we may miss opportunities to target knowledge and skills accurately. Know what the exam board expect of your learners and ensure that these skills are targeted as a minimum.
If you follow the guidance above, your students will have an excellent grasp of planes. But how will this play out in their assessment? The only way to be confident in this is to analyse the ways in which your exam board assesses this content. Here are a couple of examples:
- AQA GCSE PE 9-1 - AQA always ask students about planes in the same way: they provide a performer example and ask the student to correctly identify the plane AND the axis of rotation. They also typically do this with one of their named movement analysis examples, although this could change over time.
- OCR Linear GCE (A-level) Physiological factors - OCR only asks students to include an accurate identification of a plane within a larger movement analysis. Typically, the question will be worth six marks and the plane will be just one of these marks.
When we ask students to do practice questions in exam format, the questions must reflect this structure of assessment. In other words, you must analyse your papers and prepare your students for their assessments in the most relevant way possible.
Tip Number 7 Interleave the hell out of teaching planes!
Planes link beautifully to other content such as the musculoskeletal systems, movement patterns and levers. Planes also link, by nature, to every single movement that human beings are capable of. Therefore, planes can be introduced in many different contexts and can be associated with other learning.
Of all the topics we teach in PE, planes is one of the most fundamental. It features in every single PE practical lesson and it supports the movement, mechanics, skeletal and muscular systems components of any theory course. Therefore, planes can be taught everywhere and anywhere. Planes can be referred to when we demonstrate a basketball set shot, when a student pulls on the handle of a rowing machine, and endlessly within gymnastics. It also relates to base concepts such as alignment when stretching or how to change direction in any sport. Therefore, students should not be exposed for the first time halfway through year 10. Just as we might teach a muscle name during a practical lesson, we need to get into the habit of teaching broader PE concepts when on the field or in the gym.
Furthermore, the initial topics of most PE theory courses are based on the musculoskeletal system. Topics such as these are directly related to planes and planes can be introduced to students as future learning from lesson one.
Tip Number 8 Interleave the hell out of practice and review!
When setting a task, a worksheet or some questions, it is vital that students are expected to "discriminatively contrast" between older and newer learning. This does not need to be for every task but our courses should be structured to cause learners to return to previous learning in context throughout.
It is essential that, when students take part in the review of learning through retrieval practice, exam practice or by being reinstructed, at least some of these experiences are interleaved with associated topics. This is a very powerful methodology. According to The Meta-learners’ research, interleaving practice episodes leads to up to 73% improvement in memory of key concepts over 30 days. Therefore, some days after learning all about planes, it would be a great idea if you were to set your students some practice questions on planes but also on lessons like levers, movement patterns, bones and muscle pairs.
By doing this, students are forced to discriminate between topic areas and experience skills which can be broadly referred to as “discriminative contrast”. The need for a learner to discriminatively contrast when practising means two things:
- They experience desirable difficulty in the practice environment because they have no choice but to fully analyse questions to ensure they know exactly what they are referring to.
- The retention of this material is strengthened significantly compared to non-interleaved practice environments, where students answer a series of questions on planes all by itself.
Furthermore, interleaving practice is free. It costs nothing and can add huge value to our courses and student performance.
Tip Number 9 Don’t be afraid of technical language.
Don't overemphasise whether your students learn the language of frontal, sagittal and transverse from the get-go. The key thing is that they understand the concept. If the concept is honed, the language will naturally follow and students will enjoy using it to demonstrate their understanding.
Students have learned that technical language equals “hard to learn.” It isn’t. In the case of planes (and axes), the core understanding is extremely simple. It really is as simple as stating that all movement occurs along at least one plane. That’s it! Focus on this part of the learning journey and, once this has been rendered down and delivered beautifully (see points 1 and 7), the language of sagittal, frontal and transverse can be drilled through practice and review (points 5 and 8).
I have seen teachers overvalue the technical language too early in the learning process. In my opinion, the language needs to be based on understanding the concept, not the other way around. Don’t get frustrated if students mix up the planes or spell sagittal with two g’s and one t. This happens to learners all the time and does not mean the learner has not understood the concept.
Tip Number 10 Focus hard on AO2 (normally)!
Apply, apply apply! And expect students to do the same. Without this, we are provided a ceiling above our learners. Be brave with examples too. Many - in fact most - sporting techniques contain multiplanar movement. Explore this with learners once the main concept is honed.
By definition, planes is an AO2 topic. When the student is assessed (see point 6), they will be required to display their knowledge in relation to performance. Therefore, our teaching must be centrally focussed on performance or movement in general. Introduce the concept of planes with examples right from the get-go (rather than introducing examples later) and make sure that the student gets to analyse as many movement examples as possible (see point 4).
However, it is important to be careful with example imagery. There are two major issues with 2D images when it comes to planes:
- Almost all sporting movements are, in fact, multiplanar. Take a discus throw as an example: if you show an image of a thrower and include the transverse plane, students may be confused because almost every movement that has occurred in the image is along either the sagittal or the frontal plane.
- Images are static. They are a moment in time rather than what we are trying to analyse, which is an ongoing action.
The answer to both of these issues is the same one: AO2 imagery must be combined with excellent summary headings, descriptors and/or use of arrows to express motion. Take a look at these two examples:
![]()
What to do!
![]()
What NOT to do!
And finally
To finish this epic post off, I want to reiterate one of these ten recommendations as the most important. Which do you think it is?
For me, the most important tip is tip eight: Interleave the hell out of practice and review. If we do this, students build skills that are much broader than understanding. They are comparative, evaluative and analytical and, at the heart of it, they pose a much truer challenge of what the student ultimately needs to demonstrate in their examination or coursework.
Interleaving is commonly misunderstood and I urge you all to learn more via these three resources: